
Sony NEX 3D Sweep Panorama to Wobble 3D via StereoPhotoMaker
- Download the latest version of StereoPhotoMaker by Masuji SUTO.
- Extract the file into a directory.
- Copy an MPO (multi-picture object) file created with 3D Panorama Sweep from the Sony NEX camera with ver. 02 firmware into the directory in step #2.
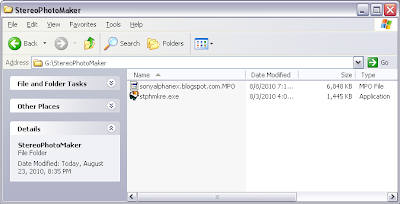
- Drag and drop the MPO file onto stphmkre.exe.
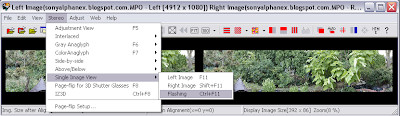
- StereoPhotoMaker will open up with the Left and Right image of your NEX 3D MPO file.

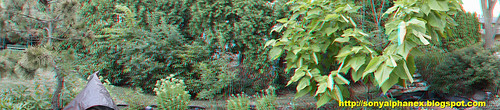
- To view with Red-Blue 3D glasses, click on Stereo > ColorAnaglyph > Optimized Anaglyph.

- To view as a wobble 3D image, click on Stereo > Single Image View > Flashing. Adjust the speed to your preference.

- You can resize the final output by clicking Edit > Resize. Enter your preference and make sure to Keep the Aspect Ratio.

- To save the anaglyph of the NEX 3D MPO file, perform step #6, then click on File > Save Stereo Image. The save dialog will pop up, press save.

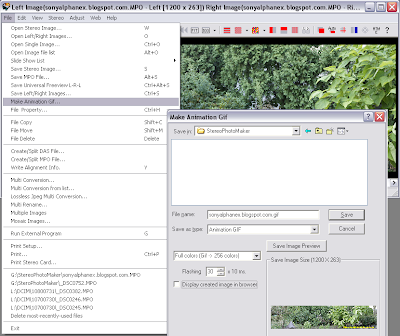
- To save the animated gif of the NEX 3D MPO file, click on File > Make Animation Gif. The save dialog will pop up, press save.


This is our first time with StereoPhotoMaker, if you have any tips or tricks with the software please let us know.
There are more tutorials at the StereoPhotoMaker website. Thank you Masuji SUTO.
Or you can skip steps 1 to 10 by buying a 3D Bravia TV.

Email us your Sony NEX 3D photos!


No comments:
Post a Comment